这篇文章运用简单易懂的例子给大家介绍使用vue.js封装switch开关组件的方法,内容非常详细,感兴趣的小伙伴们可以参考借鉴,希望对大家能有所帮助。
我的项目本来用的element,但是switch开关不符合设计要求,于是自己封装了一个switch组件,并且实现了switch开关的双向数据绑定
<template>
<label role="checkbox" :class="['switch', { toggled }]">
<input type="checkbox" class="switch-input" @change="toggle" />
<div
class="switch-core"
:
>
<div
class="switch-button"
:style="{
transition: `transform ${speed}ms`,
transform: toggled ? null : `translate3d(32px, 0px, 0px)`
}"
></div>
</div>
<span class="switch-label label-right" v-if="toggled" v-html="labelChecked">
</span>
<span class="switch-label label-left" v-html="labelUnchecked" v-else>
</span>
</label>
</template><script>
export default {
name: "ToggleSwitch",
data() {
return {
toggled: this.value
};
},
props: {
value: {
type: Boolean,
default: true
},
speed: {
type: Number,
default: 100
},
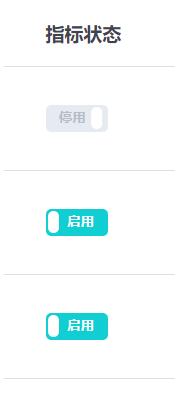
labelChecked: {
type: String,
default: "启用"
},
labelUnchecked: {
type: String,
default: "停用"
},
colorChecked: {
type: String,
default: "#11CED2"
},
colorUnchecked: {
type: String,
default: "#E6EAF1"
}
},
watch: {
value: function(val) {
this.value = val;
}
},
methods: {
toggle(event) {
this.toggled = !this.toggled;
this.$emit("update:value", this.toggled);
this.$emit("change", event);
}
}
};
</script><style lang="scss" scoped>
.switch {
display: inline-block;
position: relative;
overflow: hidden;
vertical-align: middle;
user-select: none;
font-size: 10px;
cursor: pointer;
.switch-input {
display: none;
}
.switch-label {
position: absolute;
top: 0;
font-weight: 600;
color: white;
z-index: 2;
&.label-left {
left: 10px;
line-height: 20px;
border-top-left-radius: 2px;
border-bottom-left-radius: 2px;
color: #b5bdc8;
}
&.label-right {
right: 10px;
line-height: 20px;
border-top-right-radius: 2px;
border-bottom-right-radius: 2px;
}
}
.switch-core {
display: block;
position: relative;
box-sizing: border-box;
outline: 0;
margin: 0;
transition: border-color 0.3s, background-color 0.3s;
user-select: none;
width: 46px;
height: 20px;
border-radius: 4px;
line-height: 20px;
.switch-button {
width: 8px;
height: 16px;
display: block;
position: absolute;
overflow: hidden;
top: 2;
left: 2;
z-index: 3;
transform: translate3d(0, 0, 0);
background-color: rgba(255, 255, 255, 1);
border-radius: 4px;
margin-top: 2px;
margin-left: 2px;
}
}
}
</style>调用开关组件
<toggle-switch
       v-model="value"
       :value.sync="value"
       @change="switchChange"
      >
      </toggle-switch>
组件实现了switch开关的双向数据绑定,在父组件的methods中写一个@change事件
switchChange() {
   console.log("switch值改变");
},补充知识:vue 监控el-switch控件值的变化
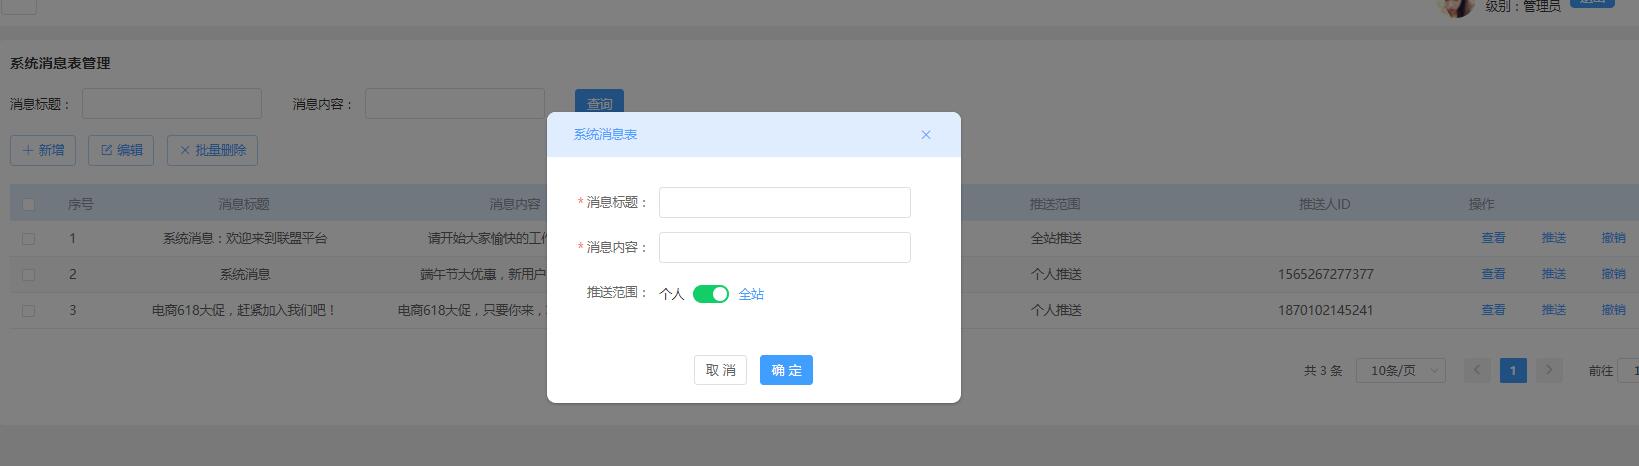
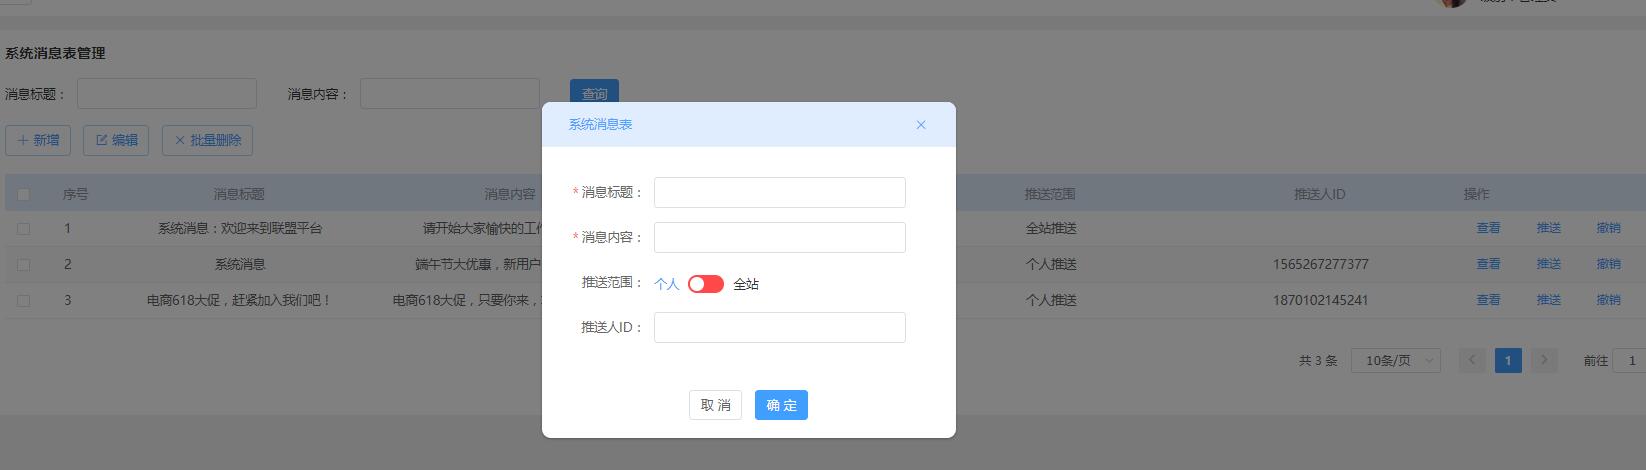
我要的效果是根据系统消息的推送范围决定推送人标签的显示,如下图两种情况:
——选择全站推送
——选择个人推送
——页面定义的data对象
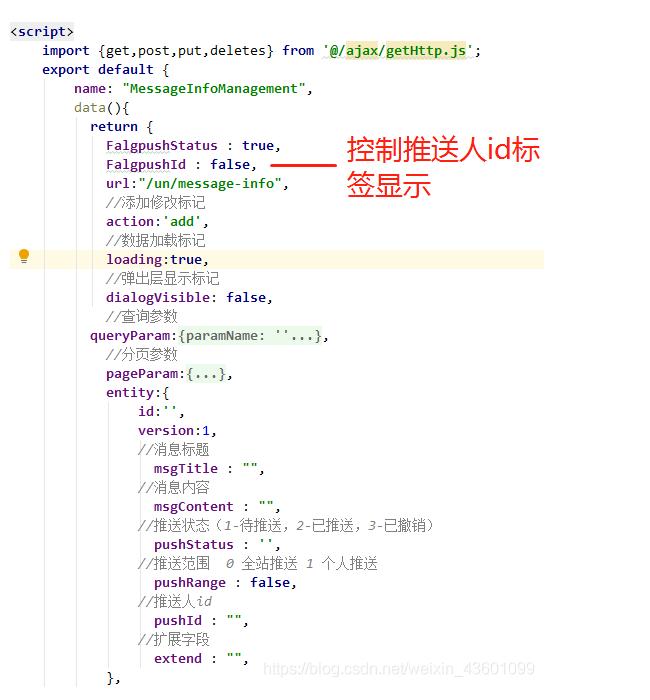
el-switch标签控件的代码, v-model="entity.pushRange"绑定的是推送范围字段
 <el-form-item label="推送范围:" :label-width="formLabelWidth" prop="pushRange">
    <el-switch
     v-model="entity.pushRange"
     active-color="#13ce66"
     inactive-color="#ff4949"
     active-text="全站"
     inactive-text="个人"
     @change="parens2($event)">
    </el-switch>
 </el-form-item>
下面的推送人id文本框,v-if=“FalgpushId”用来控制该文本框的显示,等于false时隐藏,true时显示(默认值为初始化时定义的FalgpushId = false,所以隐藏掉了)
 <!-- 推送人id -->
 <el-form-item label="推送人ID:" :label-width="formLabelWidth" prop="pushId" v-if="FalgpushId">
   <el-input v-model="entity.pushId" :disabled="disabled" clearable></el-input>
 </el-form-item>
methods中的方法,通过$event写法来监控该控件值的变化
 methods:{

  //该方法传入推送范围值,根据判断,决定是否展示其下面的推送人ID文本框
     parens2(value){
      let self = this ;
      if(value == false){
       //el-switch控件为 个人推送时,value为false
       self.FalgpushId = true;   //推送人id文本框显示
       self.entity.pushRange = false;
      }else if(value == true){
       //el-switch控件为 true 全站推送,value为true
       self.FalgpushId = false;   //推送人id文本框隐藏
       self.entity.pushRange = true;
      }
     },
 }
关于使用vue.js封装switch开关组件的方法就分享到这里了,希望以上内容可以对大家有一定的帮助,可以学到更多知识。如果觉得文章不错,可以把它分享出去让更多的人看到。
免责声明:本站发布的内容(图片、视频和文字)以原创、转载和分享为主,文章观点不代表本网站立场,如果涉及侵权请联系站长邮箱:is@yisu.com进行举报,并提供相关证据,一经查实,将立刻删除涉嫌侵权内容。


