这篇文章主要讲解了“springboot如何整合gateway实现网关功能”,文中的讲解内容简单清晰,易于学习与理解,下面请大家跟着小编的思路慢慢深入,一起来研究和学习“springboot如何整合gateway实现网关功能”吧!
网关可提供请求路由与组合、协议转换、安全认证、服务鉴权、流量控制与日志监控等服务。可选的网关有不少,比如 Nginx、、Linkerd 、eureka、 Spring Cloud Gateway、consul等。
Spring Cloud Gateway 针对进来的请求做各种判断和处理,比如说判断请求的合法性、权限验证,请求地址改写,请求参数、头信息、cookie 信息的分析和改写,请求速率控制,日志留存等。而这些都可以方便的通过 Predicate 和 GatewayFilter 来组合实现。
引入依赖
<dependency>
            <groupId>org.springframework.cloud</groupId>
            <artifactId>spring-cloud-starter-gateway</artifactId>
            <version>3.0.4</version>
        </dependency>
        <!--服务注册/发现中心依赖-->
        <dependency>
            <groupId>com.alibaba.cloud</groupId>
            <artifactId>spring-cloud-starter-alibaba-nacos-discovery</artifactId>
        </dependency>

        <!--服务的配置中心依赖-->
        <dependency>
            <groupId>com.alibaba.cloud</groupId>
            <artifactId>spring-cloud-starter-alibaba-nacos-config</artifactId>
        </dependency>

        <!--fegin组件-->
        <dependency>
            <groupId>org.springframework.cloud</groupId>
            <artifactId>spring-cloud-starter-openfeign</artifactId>
            <version>3.0.2</version>
        </dependency>
        <!-- Feign Client for loadBalancing -->
        <dependency>
            <groupId>org.springframework.cloud</groupId>
            <artifactId>spring-cloud-loadbalancer</artifactId>
            <version>3.0.2</version>
        </dependency>
        <!--客户端负载均衡loadbalancer-->
        <dependency>
            <groupId>org.springframework.cloud</groupId>
            <artifactId>spring-cloud-starter-loadbalancer</artifactId>
        </dependency>
yml配置
server:
  port: 8001

spring:
  application:
    name: gateway-service #服务名
  profiles:
    active: dev #环境设置
  cloud:
    gateway:
      routes:
        # 透传服务
        - id: gateway-client #设置路由id(理论上是可以随便写的)
          uri: lb://gateway-client  #设置路由的url lb://nacos服务注册名称
          predicates:
            - Path=/client/** #路径匹配规则
          filters:
            - StripPrefix=1
        - id: gateway-consumer
          uri: lb://gateway-consumer
          predicates:
            - Path=/consumer/**
          filters:
            - StripPrefix=1
跨域配置
@Configuration
public class CorsConfig {
    @Bean
    public CorsWebFilter corsFilter() {
        CorsConfiguration config = new CorsConfiguration();
        config.addAllowedMethod("*");
        config.addAllowedOrigin("*");
        config.addAllowedHeader("*");

        UrlBasedCorsConfigurationSource source = new UrlBasedCorsConfigurationSource(new PathPatternParser());
        source.registerCorsConfiguration("/**", config);

        return new CorsWebFilter(source);
    }
}引入依赖
<dependency>
            <groupId>org.springframework.boot</groupId>
            <artifactId>spring-boot-starter</artifactId>
        </dependency>

        <dependency>
            <groupId>org.springframework.boot</groupId>
            <artifactId>spring-boot-starter-test</artifactId>
            <scope>test</scope>
        </dependency>

        <!--服务注册-->
        <dependency>
            <groupId>org.springframework.cloud</groupId>
            <artifactId>spring-cloud-starter-alibaba-nacos-discovery</artifactId>
            <version>0.2.1.RELEASE</version>
        </dependency>
        <!--服务调用-->
        <dependency>
            <groupId>org.springframework.cloud</groupId>
            <artifactId>spring-cloud-starter-openfeign</artifactId>
        </dependency>

        <dependency>
            <groupId>org.springframework.boot</groupId>
            <artifactId>spring-boot-starter-web</artifactId>
        </dependency>
yml配置
server:
  port: 8002

spring:
  application:
    name: gateway-client #服务名
  profiles:
    active: dev #环境设置
  cloud:
    nacos:
      discovery:
        server-addr: 127.0.0.1:8848 #nacos服务注册
控制层请求
@RestController
public class TestController {

    @RequestMapping("/index")
    public String index(){
        return "gateway-client";
    }

}
启动类
@SpringBootApplication
@EnableDiscoveryClient
public class GatewayClientApplication {

    public static void main(String[] args) {
        SpringApplication.run(GatewayClientApplication.class, args);
    }
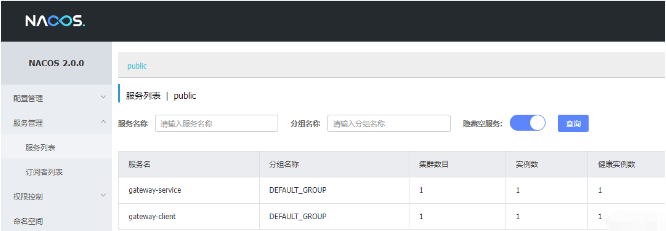
}采用nacos作为注册中心,启动nacos后再启动gateway-service, gateway-client项目
在nacos发现服务注册成功
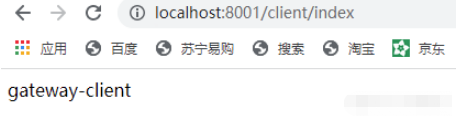
在浏览器发起请求
http://localhost:8001/client/index
实际上网关把请求发送到gateway-client服务,返回结果
感谢各位的阅读,以上就是“springboot如何整合gateway实现网关功能”的内容了,经过本文的学习后,相信大家对springboot如何整合gateway实现网关功能这一问题有了更深刻的体会,具体使用情况还需要大家实践验证。这里是亿速云,小编将为大家推送更多相关知识点的文章,欢迎关注!
免责声明:本站发布的内容(图片、视频和文字)以原创、转载和分享为主,文章观点不代表本网站立场,如果涉及侵权请联系站长邮箱:is@yisu.com进行举报,并提供相关证据,一经查实,将立刻删除涉嫌侵权内容。


